


Once Upon a Time in the Middle East 欢迎来龙餐馆


Understanding the Cube Structure First
Before we explain how to solve the Rubik’s Cube, the first thing you should know is how the cube is built. This might sound trivial, but understanding the cube structure helps you read the guide more easily.
The Rubik’s Cube Core Structure: Color Centers, Edges, and Corners
Your cube has three types of pieces, and they each behave differently.
Center Pieces
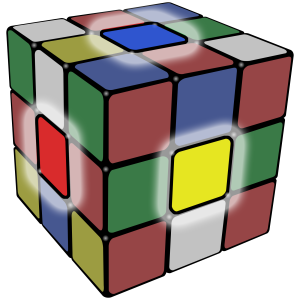
Image Source: learnhowtosolvearubikscube
The center pieces have one colored sticker and stay in the same position relative to each other.
There are six of them. They tell you what color each face should be when solved.
Edge Pieces
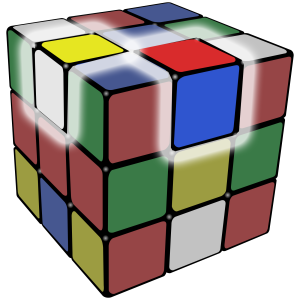
Image Source: learnhowtosolvearubikscube
The edge pieces have two colored stickers and sit between corners.
There are twelve edges total. They can move to different positions, but an edge will always be an edge, and it can’t become a corner.
Corner Pieces
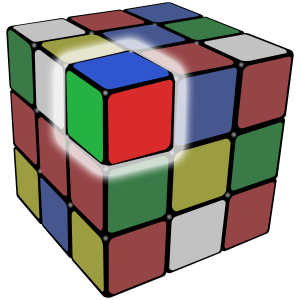
Image Source: learnhowtosolvearubikscube
The corner pieces have three colored stickers and sit at the cube’s corners. There are eight corners. Like edges, they move around but always stay corners.
This matters because you’re not moving individual stickers. You’re moving entire pieces that have multiple colors.
Rubik’s Cube Notation and The Terms We Will Use to Indicate The Movement
Now that you know how the cube is structured, it’s time to get into the movement and direction that we will be covering. It’s actually really simple.
The abbreviated terms are as below, using single letters to represent each face of the cube:
F = Front
R = Right
U = Up
L = Left
D = Down
B = Back
Now that you’re accustomed with the faces of the cube, it’s time to speak about the movements.
A letter by itself (like R) means turn that face clockwise 90 degrees. Add an apostrophe (R’) and you turn it counterclockwise instead. See a number 2 (R2)? That’s a 180-degree turn—two quarter turns in the same direction.
When you’re reading an algorithm like F R U R’ U’ F’, you’re literally just following those six moves in order. It looks like weird math at first, but after a few tries, you’ll be reading it with ease.
The key is remembering that clockwise is always from the perspective of looking directly at that face. So R means clockwise when you’re staring at the right side of the cube.
DID YOU KNOW: There’s Actually A Chinese Movie Called It’s My Time 魔方小姐 About The Rubik’s Cube

Starring the Malaysian legend Michelle Yeoh, she plays a 70-year-old senior who is reigniting her life through a Rubik’s Cube competition.
This film also marks Yeoh’s first Chinese film after winning the Academy Award for Best Actress back in 2023.
Also, if you are eager for more upcoming drama and adrenaline movie titles, check out our coming soon list!
Step-By-Step Solution Walkthrough for Solving The Rubik’s Cube
The beginner’s method breaks the cube into layers that you solve one at a time. You’ll start with the white face, work through the middle, then tackle the yellow top layer using specific moves that won’t mess up what you’ve already completed.
Here’s a more detailed explanation for each step:
Step 1: Making the White Cross
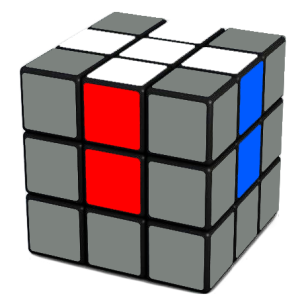
Image Source: learnhowtosolvearubikscube
Pick a color to start with; most people choose white. Your goal is to make a plus sign on the white face with four white edge pieces arranged correctly.
Also, make sure the edge pieces match the center colors on the sides too. If you have a white-blue edge piece, the white part goes on the white face while the blue part aligns with the blue center on the side. This is where people usually mess up their first attempt.
You can solve this intuitively without memorizing algorithms. Move the white edges into position one at a time. If a white edge is on the bottom layer, rotate that layer until the edge sits below where it needs to go, then flip it up. If it’s in the middle layer, move it to the top or bottom first.
Don’t worry if you accidentally undo a piece you already placed. This step teaches you how the cube moves. The white cross gives you a foundation that everything else builds on, so take your time getting comfortable with basic rotations.
Step 2: Solving the White Corners
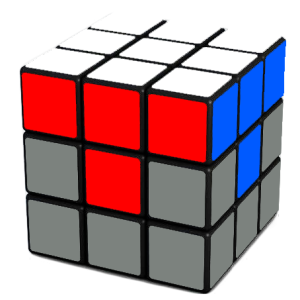
Image Source: learnhowtosolvearubikscube
Now you’ll complete the entire white face by positioning the four white corner pieces. Each corner has three colors, and all three need to match their corresponding center pieces.
Find a white corner on the bottom layer. Twist the bottom until that corner sits directly below its correct spot on top. The corner might be oriented three different ways—white facing down, white facing you, or white facing right.
Use one of these short algorithms based on how the white sticker faces:
- White facing front: R U R’
- White facing right: F’ U’ F
- White facing down: R U2 R’ U’ R U R’
If a white corner is already on top but twisted wrong, use R U R’ U’ to pop it out to the bottom layer. Then you can reinsert it correctly. Once all four white corners are in place, flip the entire cube upside down so white faces the bottom.
Step 3: Completing the Middle Layer
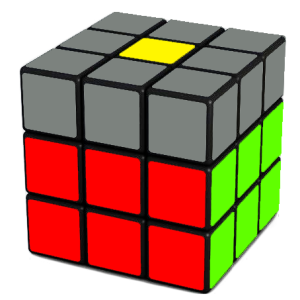
Image Source: learnhowtosolvearubikscube
The middle layer has four edge pieces that don’t have yellow or white on them. You’ll move these edges from the top layer into their correct middle positions using two mirror algorithms.
Look at the top layer and find an edge without yellow. Rotate the top until that edge’s front color matches the front center color. Check the other color on that edge piece—does it match the left center or right center?
If it matches the left center, use: U’ L’ U L U F U’ F’
If it matches the right center, use: U R U’ R’ U’ F’ U F
Sometimes an edge is already in the middle layer but facing the wrong way. Insert a different edge into that spot using one of the algorithms above, which pushes the wrong piece back to the top.
Then you can reinsert it properly. This layer takes practice, but the logic stays consistent.
Step 4: Building the Yellow Cross
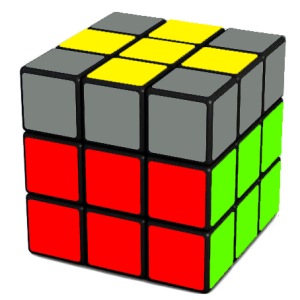
Image Source: learnhowtosolvearubikscube
You’re making a yellow plus sign on top now, though the edge pieces don’t need to match the side colors yet. The top might show three different patterns: a yellow dot, a yellow L shape, or a yellow line.
Use this algorithm to move through the patterns: F R U R’ U’ F’
Apply it three times if you see a dot. Hold the cube so the L shape sits in the top-left position, then apply it twice.
If you have a horizontal line going left to right, run it once. Each application changes the pattern until you get your yellow cross.
The algorithm is the same every time; what changes is how many times you repeat it and how you hold the cube.
Once you see that yellow cross on top, you’re two-thirds done with the entire cube. We’re nearing the end as we head to conquering the final layer.
Step 5: Aligning the Yellow Edges
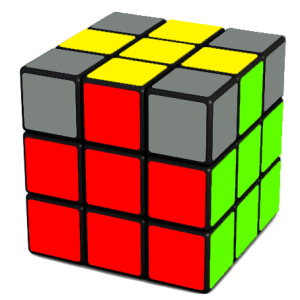
Image Source: learnhowtosolvearubikscube
You need to create a yellow cross on top first. Hold your cube so the yellow face points up, and look at the edges (not the corners yet).
If you already have a yellow cross, you’re ahead of the game. If not, you’ll see one of these patterns: a yellow dot, an L shape, or a yellow line. Each one needs a specific algorithm to turn it into a cross.
For the yellow dot pattern:
- Do: F R U R’ U’ F’
For the L shape:
- Position the L in the top-left corner
- Do: F U R U’ R’ F’
For the yellow line:
- Position the line horizontally
- Do: F R U R’ U’ F’
After you make the cross, check if the edge colours match their center pieces on the sides. If they don’t line up, hold the cube with one correct edge facing you and do: R U R’ U R U U R’ U. Repeat until all edges match their sides.
Step 6: Positioning the Yellow Corners
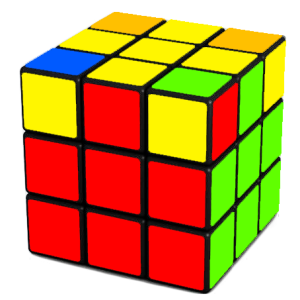
Image Source: learnhowtosolvearubikscube
Now you need to get the yellow corners in the right spots. They don’t need to be twisted correctly yet—just in the right positions.
Look at your top layer corners. Find one corner that’s already in the correct position (the colours match the three faces it touches, even if yellow isn’t on top).
If you find one correct corner, hold it in the front-right position. Then do this algorithm: U R U’ L’ U R’ U’ L. This moves the other three corners around while keeping that one corner in place.
If no corners are in the right position:
- Do the algorithm once from any angle
- One corner will end up correct
- Put that corner in front-right and repeat the algorithm
You might need to do this algorithm two or three times. That’s normal. Check after each round to see if all corners are in their correct positions.
Step 7: Twisting the Yellow Corners for the Finish
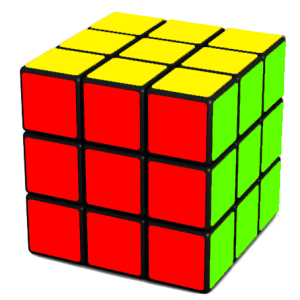
Image Source: learnhowtosolvearubikscube
Your corners are in the right spots, but some might be twisted wrong. This final step flips them without moving them around.
Pick any corner that needs twisting and put it in the top-right-front position. Do this algorithm: R’ D’ R D. Repeat it two, four, or six times until that corner shows yellow on top.
The cube will look messy during this process. Don’t panic—that’s supposed to happen.
Once the first corner is fixed, turn only the top layer (U turn) to bring the next unsolved corner into the top-right-front spot. Do R’ D’ R D again until this corner is fixed. Keep going until all four corners show yellow on top.
After you fix the last corner, the entire cube should be solved. If it looks wrong, you probably turned the whole cube instead of just the top layer between corners.
Go back and make sure you’re only rotating the U face to switch between corners.
And that’s it, congrats, you’ve finally solved the Rubik’s Cube!
Movies You'll Love

All Wishes Come True! 八仙!

Kung Fu Soccer 功夫女足

The Rope Curse 4: Kuntilanak 粽邪4:坤蒂拉娜

The Wandering Earth III



TRENDING


MOVIES YOU'LL LOVE
Once Upon a Time in the Middle East 欢迎来龙餐馆
All Wishes Come True! 八仙!
Kung Fu Soccer 功夫女足
The Rope Curse 4: Kuntilanak 粽邪4:坤蒂拉娜
The Wandering Earth III

Good Trip 我阿爹想旅行
Ne Zha 3 哪吒3

The Nine Emperor Gods 九皇爷

I Am What I Am 2 雄狮少年2

Oh My Ghost! Oh My God! 怎么可能我家的祖先是你家的鬼

V 空枪

Last Minute Date 喜到临头

Da Sheng Rises 大圣崛起

Heroes of Dunhuang 敦煌之战

Dunk for Future 喜羊羊与灰太狼之筐出未来

Honor of Kings 王者荣耀 (2028)

The Boy Who Counted Cars 我看见两朵一样的云

The Old Dog 老江湖
Twilight of the Warriors: Dragon Throne 九龍城寨之龍頭

The Forbidden Land 蛮荒禁地

The Decisive Moment 群星闪耀时